This guide will show you how to connect and activate Customer Match lists using the Google Tentacles and Google Ads framework. The framework can be used to activate your (FPID) data in the marketing and advertising platforms. Consider building a headless Customer Data Platform (CDP) within an (existing) cloud/data environment without an expensive CDP tool or suite

- Customer Match Automate the audience push to Google Ads (Customer Match lists), based on the (hashed) email addresses or other available identifiers.
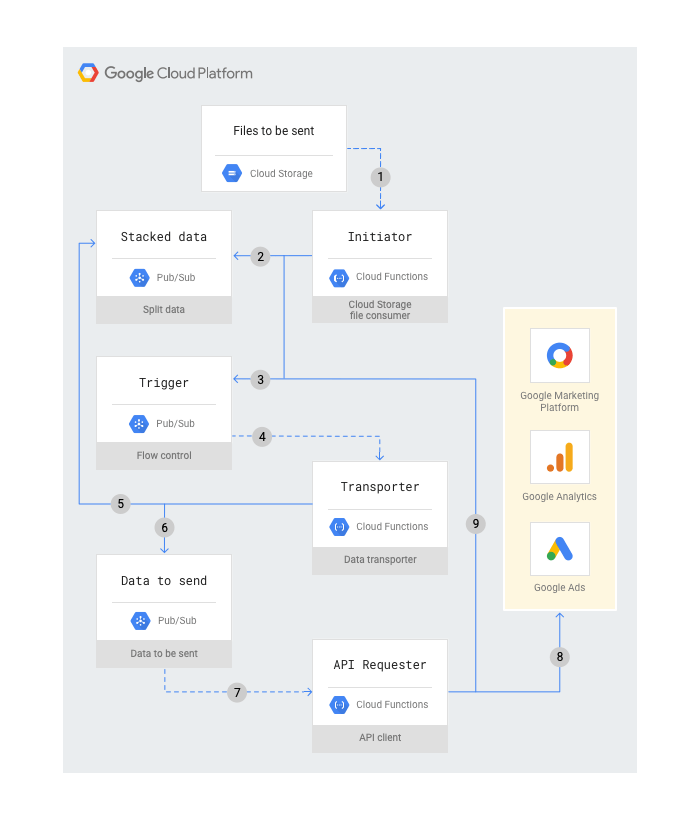
- Google Tentacles runs “serverless” within the Google Cloud Platform and starts running when a new file is uploaded in a specific Storage bucket.
- These files are new line delimited JSONs, containing the create and remove to audience operations. These files can be generated by your data warehouse (e.g. Google BigQuery or Dataflow).
- Can be used for a lot of common use cases (pushing audiences or conversion events to external platforms).
- The framework itself is focused on Google products (what a surprise!), but connectors for non-Google products can be developed easily (e.g. Facebook Conversion API or Custom Audience connector).
What are Tentacles?
Tentacles is an (unofficial) Google framework, operating serverless using different services within the Google Cloud Platform, like Cloud Functions & PubSub. The integration framework is able to handle large amounts of data to be sent to other, mostly marketing-related Google products (like Google Analytics data upload, Google Campaign conversions, or Google Ads Custom Audiences). Next to all the Google-related connectors, the framework handles tasks like queueing, batching, rate-limits, and (error) logging and therefore can be used perfectly for building custom connectors, like a Facebook Custom Audience connector we’ve to build.
More background information on the framework is in this article.

1. Preparation
If not present already, create a Google Cloud project (instructions) where you can run Tentacles. Tentacles provide you with a bash install script, that will check and activate all services / APIs needed. It assumes you’re a project administrator, so if it’s not possible to grant administrator rights, at least you need the following permissions/roles;
- Service Account User
- Cloud Functions Developer
- Pub/Sub Editor
- Storage Admin
- Service Usage Admin
- Cloud Datastore User
- Service Management Administrator
The following services / APIs are used by Tentacles, if not activated already, the install script will enable it for you;
In new GCP projects, you have to select a Datastore / Firestore operation mode. For Tentacles, choose the Firestore Native mode. You can’t change this setting later on, so make sure you set it to Firestore Native mode.
- Google Ads API (you have to enable this manually in your project)
- Google Cloud Storage
- Firestore (Native mode)
- Google Cloud Functions
- Google Pub/Sub
Create an OAuth Client
- In GCP navigate to Google APIs & Services > Credentials
- If not present already, configure the consent screen and fill out the required fields.
- Create new OAuth 2.0 Client credentials. When creating, select the Desktop app Create )Desktop app
- Write down the
Client-IDandClient-Secret, you will need it during the installation.
Google Ads API basic access
In Google Ads, create an API developer token and apply for API basic access. This will take some days. See documentation
2. Installation/deployment
Let’s move on to the deployment of Tentacles.
- In your Google Cloud project, open up the Cloud shell (top right).
- Clone the repository to your Cloud shell instance;
1git clone https://github.com/GoogleCloudPlatform/cloud-for-marketing.git- Run the install script and follow the instructions.
1cd cloud-for-marketing/marketing-analytics/activation/gmp-googleads-connector
2bash deploy.sh
- The namespace chosen will be the prefix of all services created by Tentacles
- When asked for the APIs (connectors) to install, choose “Google Ads API for Customer Match Upload” (option 5).
- Enter the Client-ID and Cliend-Secret you’ve created in the earlier steps, this will generate a verification link that results in a response code you need to paste back into the install script.
The install script will enable all the services if not already, creating the Pub/Sub topics, Cloud Functions, Cloud bucket, and triggers. The next step is to configure the Google Ads Customer Match connector.

3. Configure the Google Ads connector
The Google Ads connector uses the Google Ads API (not the old Google Adwords API). It expects;
- Two separate JSON files per audience, co (per audience), with one of the available customer identifiers, like (hashed) email or telephone. See this page for all available identifiers.
- One file containing the
create(add) to audience operations - One file containing the
removefrom audience operations
Be aware that you’re uploading customer data to Google, so make sure you have the correct consent / permissions from those users.

Connector configuration
Every Google Ads audience needs to be defined in the config_api.json file. For the same audience, you have to create 2 configurations, one for create operators and one for remove operators.
As I’m told, this is because Tentacles mimics the behavior of the Google Ads API. The Google Ads API separates create and delete operations. Next to that, using multiple identifiers (like hashed email and phone) also results in additional configurations, because the Google Ads API also separates these operations.
| Setting | Description |
|---|---|
| developer token | Google Ads developer token. Make sure you have Basic Access to the Google Ads API |
| customer_id | Google Ads account ID where you want the audiences to be created |
| login_customer_id | Google Ads MCC account-ID, when accessing the account through an MCC. |
| list_id | Google Ads Customer Match list ID > You will have to create the audience first in the interface and fetch the ID. Hopefully, automatic audience creation will be added in the future |
| list_type | Type of identifiers you wish to upload to this audience, for example hashed_email or hashed_phone_number. See this page. |
| operation | create or remove, so you have to create two separate configurations for the same audience |
Example config_api.json file.
ACM: Ads Customer Match configurations (the config_api.json can also contain configurations for the other connectors
{
  "ACM": {
    "audience_1_add": {
        "developerToken": "<GOOGLE-ADS-API-DEVELOPER TOKEN>",
        "customerMatchConfig": {
            "customer_id": "<ADS-CUSTOMER-ID>",
            "login_customer_id": "<ADS-MCC-CUSTOMER-ID>",
            "list_id": "<CUSTOM-AUDIENCE-ID>",
            "list_type": "hashed_email",
            "operation": "create"
        }
    },
    "audience_1_remove": {
        "developerToken": "<GOOGLE-ADS-API-DEVELOPER TOKEN>",
        "customerMatchConfig": {
            "customer_id": "<ADS-CUSTOMER-ID>",
            "login_customer_id": "<ADS-MCC-CUSTOMER-ID>",
            "list_id": "<CUSTOM-AUDIENCE-ID>",
            "list_type": "hashed_email",
            "operation": "remove"
        }
    }
  }
}- Go back to the Google Cloud shell.
- You can use the file editor (Open Editor button), navigate to
cloud-for-marketing/marketing-analytics/activation/gmp-googleads-connector - Open
config_api.jsonand edit the contents / paste your Google Ads Custom Audience configuration.
Then, run the following command to upload or update the config into Tentacles (the bash script will load or update the configuration into the Firestore database).
1bash deploy.sh update_api_configThe install script doesn’t remove entries in the Firestore database, only adds or updates.
Now, Tentacles is all set to receive the JSON files containing the create and remove operations for Google Ads audiences.
4. Automate the Google Ads import files
The last step is to automate the generation of the newline delimited JSON files. The naming of these files should like like API[ACM]_config[audience_1_add]_<YYYYMMDD>.json, where the connector key (ACM) and config key (audience_1_add) should match the entries in config_api.json
The content of the newline delimited JSON files should look like;
1{ "hashed_email": "f660ab912ec121d1b1e928a0bb4bc61b15f5ad44d5efdc4e1c92a25e99b8e44a" }
2{ "hashed_email": "bceede42d53175d644efb79514d3967d3f9b92eb810b2c30bcddfae571b8b377" }
3{ "hashed_email": "8d1dc4e440a9965c3388c8714d3dd25ce99d855fd6828396f0fab07f57fba820" }
Most likely, you will have to execute the following tasks;
- Create a selection (audience) based on available data in your data warehouse (e.g. “all high-value customers”)
- Calculate delta / incremental tables, containing the create and remove audience operations
- When using BigQuery, you could create date-sharded (partition) tables (audience_1_YYYMMMDD), holding all the SHA256 hashed emails of that date for the specific audience.
- Based on these data-sharded tables, you can calculate the differences between the most recent audience state and the audience state of the previous date.
- With these differences/deltas, you can create two intermediate tables, one containing the SHA256 hashed emails for the create operations (new users in the audience), the other containing the delete operations (users need to be deleted).
- Export the 2 intermediate tables to JSON files (newline delimited), using the correct filename > API[ACM]_config[audience_1_add]_<YYYYMMDD>.json (can be exported directly from BigQuery)
- Move the file to the Google Cloud bucket where the Tentacles Cloud Function is listening to (in the
/outboundfolder)
You could use the following SQL to calculate differences based on two date-sharded tables (current date vs. previous date):
#standardSQL
SELECT
  operator AS operator,
  JSON_EXTRACT_SCALAR(record, '$.hashed_email') AS hashed_email
FROM (
  -- Get new / adjusted records compared to previous table -> CREATE operations
  SELECT
    *,
    'create' AS operator,
  FROM (
    SELECT TO_JSON_STRING(a) AS record FROM `{table_name}_*` a WHERE _TABLE_SUFFIX = '{current_date}' -- New table
    EXCEPT DISTINCT
    SELECT TO_JSON_STRING(b) AS record FROM `{table_name}_*` b WHERE _TABLE_SUFFIX = '{prev_date}' -- Old table
  )
  UNION ALL
  -- Get missing records in current table, compared to previous table -> REMOVE operations
  SELECT
    *,
    'remove' AS operator,
  FROM (
    SELECT TO_JSON_STRING(b) AS record FROM `{table_name}_*` b WHERE _TABLE_SUFFIX = '{prev_date}' -- Old table
    EXCEPT DISTINCT
    SELECT TO_JSON_STRING(a) AS record FROM `{table_name}_*` a WHERE _TABLE_SUFFIX = '{current_date}' -- New table
  )
)
There are a lot of solutions possible automating these tasks, but you could use one of the following setups;
- Apache Airflow
Apache Airflow has all the connectors available to automate these tasks (create audience tables, create intermediate / delta tables) and export them in JSON format to the Tentacles Cloud bucket. Using Apache Airflow, you can create a scalable solution that can handle a lot of audiences.
- Scheduled Queries + Cloud Scheduler + Cloud Functions
- Use BigQuery Scheduled Queries to generate the daily full audience tables and the delta tables (see example SQL above).
- Use Cloud Functions to run a function that starts the BigQuery export job to a JSON file in the Tentacles bucket. See this code.
- Let Cloud Scheduler run the Cloud Function after the scheduled queries ran.
Summary
Tentacles will enable you to activate your data directly out of your cloud environment pretty easily. It could save some money compared to expensive CDP tools/suites, but keep in mind
- It doesn’t provide you with a nice user interface
- Only has some basic (error) logging
- Heavily Google-focused, but customer connectors can added/developed easily
Some last tips;
- Google Ads Connector; when you use multiple identifiers (like email and telephone), you need to split up files according to the number of different identifiers used + add/ remove operations. Resulting in 4 files per audience when using hashed_email and hash_phone_number for example. Not that efficient, but you can adjust the Google Ads connector (nodeJs) without much effort, for example combining create and add operations in 1 file.
- You can debug Tentacles, using the logs provided in the Google Cloud Functions interface or the Cloud Logging / Stackdriver interface.
Useful links & documentation
- Tentacles GitHub repository
- Tentacles overview & architecture by Google
- Tentacles tutorial by Google